Doubt in Bounding Rectangle Algorithm

Hello everyone,
I am currently working on issue #24217.
I reproduced the issue on my local device using Windows 10 OS.
I referred the following docs in order to understand the boundingRect function:

https://docs.opencv.org/3.1.0/dd/d49/tutorial_py_contour_features.html

And this documentation to understand how python bindings and concepts of OOPs work in opencv.

Finally considering that the actual source code for bounding Rectangle function is present in test_boundingrect.cpp file, I am not understanding that in src vector are random points being pushed in generate_src_points function? If so, why?

Instead can we just push those points which represent non zero pixels. Basically I was just trying to dry run the algorithm for the below example:
img = np.array([
[0, 0, 0, 0, 0],
[1, 1, 1, 0, 0],
], np.uint8)
Hence, just wanted to know what will be the src vector.

Can you provide the algorithm or any resource regarding the same so that I can understand it better. Thank you very much and apologies if the doubt is silly (my first attempt to contribute in open source :smile:)

Okay, Now I am a bit confused so …first where can I find the actual src code?

but contours are the boundaries right? of the objects in an image so if we apply the bounding rect to the below image

it should work right ?
Thank you!

Contributing to OpenCV is not for beginners. You need to be proficient in C++ development. That includes navigating the source code.

You found a test case, not the actual implementation.

That is wrong.

Docs clearly state:

[…] or non-zero pixels of gray-scale image

Thank you for your feedback
I understand that contributing to OpenCV requires proficiency in C++ development and familiarity with the source code. but I believe that learning and contributing can go hand in hand and “Where there is a will , there is a way”.

Regarding your comment about the test case, I apologize for the oversight. It would be of great help if you could locate me towards the actual implementation or the source code
Thank you very much :slight_smile:

Perhaps I am understanding what berak was saying, there seems to be a problem in detecting the contour… when I used findcontour() and then applied bounding rect() function the output was correct
for eg for this array
[[ 0 0 0]
[ 0 0 0]
[ 0 0 0]
[255 255 255]]
By using boundingrect(img):(0, 3, 1, 1)
By using
contours, _ = cv2.findContours(img,cv2.RETR_EXTERNAL, cv2.CHAIN_APPROX_SIMPLE) and then boundingrect(contours):(0, 3, 3, 1)

So can anyone point out the file in which detection of contours takes place specifically for bounding rect

I even performed dry run on the boundingrect() function present in modules/core/src/types.cpp (Hope I am correct this time!) for

img = np.array([
   [0, 0, 0, 0, 0],
   [1, 1, 1, 0, 0],
], np.uint8)

by using findcontours and then boxpoint function to find the coordinates of the rotated rectangle and then dry running the below program:

and the dry run output is coming correct that is (0 ,1 ,3 ,1)
So Can you please provide me with the file or code using which bounding rect finds the contour.

I even saw the scatterplot provided #24217 . Can you provide me with more explanation on the same if possible… regarding the pattern …like (odd,even) combination of (w,h) is yeilding wrong output?
Thanks

sorry, but it’s still the wrong code.

1 Like

Thank you very much for the help
In the maskboundingRect function is 4 byte alignment of the pointer necessary??

const uchar* _ptr = img.ptr(i);
const uchar* ptr = (const uchar*)alignPtr(_ptr, 4);

Or we can directly go with

cv::Rect maskBoundingRect(const cv::Mat& img) {
    CV_Assert(img.depth() == CV_8U && img.channels() == 1);

    cv::Size size = img.size();
    int xmin = size.width, ymin = size.height, xmax = -1, ymax = -1;
    bool flag = false;

    for (int i = 0; i < size.height; i++) {
        for (int j = 0; j < size.width; j++) {
            if (img.at<uchar>(i, j) != 0) {
                flag = true;
                xmin = std::min(xmin, j);
                xmax = std::max(xmax, j);
                ymin = std::min(ymin, i);
                ymax = std::max(ymax, i);
            }
        }
    }

    if (!flag) {
        xmin = ymin = xmax = ymax = 0;
    }

    return cv::Rect(xmin, ymin, xmax - xmin + 1, ymax - ymin + 1);
}

I even referred chatgpt for the same in order to know about the error : It stated that the error was due to the 4 byte alignment ? So, Can I go ahead with the above code?

oh my. what did it say (about what ?), exactly ?
(and why would you believe that ?)

your (far too much !) simplified mockup code does not need or would even profit from ptr alignment, but now, go find out why this line is so:

i cannot repeat any problem from the issue using c++:


for (int h :{3,4,5,6,7,8,9}) {
    for (int w :{5,6,7,8,9,10}) {
       Mat m(h,w,CV_8U,Scalar(0));
       m(Rect(w-3,h-1,3,1)) = 1;
       //cout << m << endl;
       Rect r = maskBoundingRect(m); // see post above
       Rect r2 = boundingRect(m);
       cout << (r==r2) << " " << r <<  r2 << endl;
    }
}

Hello!

I just wanted to know how that how significant and important is it to use memory alignment in the code and hence I referred to chatgpt . I even referred this page for understanding the memory alignment concept. but modern CPUs and compilers are designed to handle unaligned data efficiently so why is it so…like will it make a very large difference?

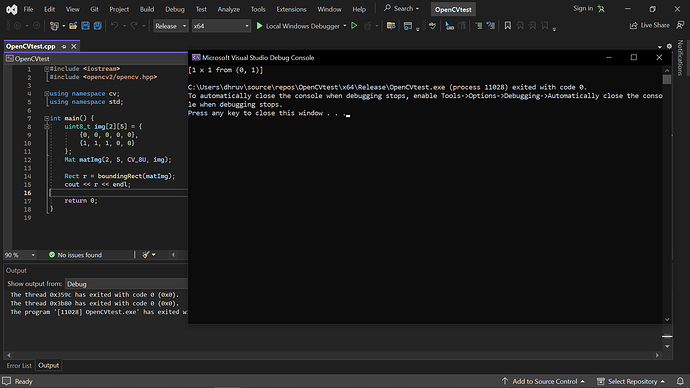
Secondly, When I tested bounding rect in c++

    uint8_t img[2][5] = {
        {0, 0, 0, 0, 0},
        {1, 1, 1, 0, 0}
    };
    Mat matImg(2, 5, CV_8U, img);

    Rect r = boundingRect(matImg);
    cout << r << endl;

the output was

[1 x 1 from (0, 1)]

Am I going wrong somewhere?

Thanks :smile:

i’m still getting

[3 x 1 from (0, 1)]

from your experiment above …

were you able to reproduce the other problem cases (from c++) ?

however, i can reproduce the python issues, on the same box, same local c++/py build

but, hmm, i cannot find any usage of this code path in the library, the resp. unit test handles only points, not pixels

Hello!
I had reproduced these issues in the test folder using visual studio 2022 which was made during the end of the build.

for this example

I tried the code given originally in the issue:

I think that I have implemented the code in a wrong place
Ideally where should have I implemented the code ??

Sorry for late reply

please post text, not useless screenshots of it

code:

#include <opencv2/opencv.hpp>

using namespace cv;
using namespace std;

int main() {
    for (int img_w = 3; img_w < 20; img_w++) {
        for (int img_h = 1; img_h < 15; img_h++) {
            Mat img(img_h, img_w, CV_8U, Scalar(0));
            img.row(img_h - 1)(Rect(0, 0, 3, 1)) = 255;

            Rect boundingRect = cv::boundingRect(img);

            if (boundingRect.width != 3) {
                cout << img_w << "x" << img_h << ": " << "w=" << boundingRect.width << endl;
            }
        }
    }

    return 0;
}

Output:

3x4: w=1
3x8: w=1
3x12: w=1
5x2: w=1
5x6: w=1
5x10: w=1
5x14: w=1
7x4: w=1
7x8: w=1
7x12: w=1
9x2: w=1
9x6: w=1
9x10: w=1
9x14: w=1
11x4: w=1
11x8: w=1
11x12: w=1
13x2: w=1
13x6: w=1
13x10: w=1
13x14: w=1
15x4: w=1
15x8: w=1
15x12: w=1
17x2: w=1
17x6: w=1
17x10: w=1
17x14: w=1
19x4: w=1
19x8: w=1
19x12: w=1

C:\Users\dhruv\source\repos\OpenCVtest\x64\Release\OpenCVtest.exe (process 18220) exited with code 0.
To automatically close the console when debugging stops, enable Tools->Options->Debugging->Automatically close the console when debugging stops.

‘OpenCVtest.exe’ (Win32): Loaded ‘C:\Users\dhruv\source\repos\OpenCVtest\x64\Release\OpenCVtest.exe’. Symbols loaded.
‘OpenCVtest.exe’ (Win32): Loaded ‘C:\Windows\System32\ntdll.dll’.
‘OpenCVtest.exe’ (Win32): Loaded ‘C:\Windows\System32\kernel32.dll’.
‘OpenCVtest.exe’ (Win32): Loaded ‘C:\Windows\System32\KernelBase.dll’.
‘OpenCVtest.exe’ (Win32): Loaded ‘C:\Windows\System32\ucrtbase.dll’.
‘OpenCVtest.exe’ (Win32): Loaded ‘C:\opencv\Builds\install\x64\vc17\bin\opencv_world480.dll’. Symbols loaded.
‘OpenCVtest.exe’ (Win32): Loaded ‘C:\Windows\System32\gdi32.dll’.
‘OpenCVtest.exe’ (Win32): Loaded ‘C:\Windows\System32\win32u.dll’.
‘OpenCVtest.exe’ (Win32): Loaded ‘C:\Windows\System32\gdi32full.dll’.
‘OpenCVtest.exe’ (Win32): Loaded ‘C:\Windows\System32\msvcp_win.dll’.
‘OpenCVtest.exe’ (Win32): Loaded ‘C:\Windows\System32\user32.dll’.
‘OpenCVtest.exe’ (Win32): Loaded ‘C:\Windows\System32\ole32.dll’.
‘OpenCVtest.exe’ (Win32): Loaded ‘C:\Windows\System32\rpcrt4.dll’.
‘OpenCVtest.exe’ (Win32): Loaded ‘C:\Windows\System32\combase.dll’.
‘OpenCVtest.exe’ (Win32): Loaded ‘C:\Windows\System32\ws2_32.dll’.
‘OpenCVtest.exe’ (Win32): Loaded ‘C:\Windows\System32\oleaut32.dll’.
‘OpenCVtest.exe’ (Win32): Loaded ‘C:\Windows\System32\comdlg32.dll’.
‘OpenCVtest.exe’ (Win32): Loaded ‘C:\Windows\System32\msvcrt.dll’.
‘OpenCVtest.exe’ (Win32): Loaded ‘C:\Windows\System32\SHCore.dll’.
‘OpenCVtest.exe’ (Win32): Loaded ‘C:\Windows\System32\shlwapi.dll’.
‘OpenCVtest.exe’ (Win32): Loaded ‘C:\Windows\System32\shell32.dll’.
‘OpenCVtest.exe’ (Win32): Loaded ‘C:\Windows\System32\advapi32.dll’.
‘OpenCVtest.exe’ (Win32): Loaded ‘C:\Windows\System32\sechost.dll’.
‘OpenCVtest.exe’ (Win32): Loaded ‘C:\Windows\System32\msvcp140.dll’.
‘OpenCVtest.exe’ (Win32): Loaded ‘C:\Windows\System32\vcruntime140_1.dll’.
‘OpenCVtest.exe’ (Win32): Loaded ‘C:\Windows\System32\vcruntime140.dll’.
‘OpenCVtest.exe’ (Win32): Loaded ‘C:\Windows\WinSxS\amd64_microsoft.windows.common-controls_6595b64144ccf1df_5.82.19041.1110_none_792d1c772443f647\comctl32.dll’.
‘OpenCVtest.exe’ (Win32): Loaded ‘C:\Windows\System32\mfplat.dll’.
‘OpenCVtest.exe’ (Win32): Loaded ‘C:\Windows\System32\cfgmgr32.dll’.
‘OpenCVtest.exe’ (Win32): Loaded ‘C:\Windows\System32\mf.dll’.
‘OpenCVtest.exe’ (Win32): Loaded ‘C:\Windows\System32\mfreadwrite.dll’.
‘OpenCVtest.exe’ (Win32): Loaded ‘C:\Windows\System32\dxgi.dll’.
‘OpenCVtest.exe’ (Win32): Loaded ‘C:\Windows\System32\d3d11.dll’.
‘OpenCVtest.exe’ (Win32): Loaded ‘C:\Windows\System32\concrt140.dll’.
‘OpenCVtest.exe’ (Win32): Loaded ‘C:\Windows\System32\mfcore.dll’.
‘OpenCVtest.exe’ (Win32): Loaded ‘C:\Windows\System32\crypt32.dll’.
‘OpenCVtest.exe’ (Win32): Loaded ‘C:\Windows\System32\bcrypt.dll’.
‘OpenCVtest.exe’ (Win32): Loaded ‘C:\Windows\System32\powrprof.dll’.
‘OpenCVtest.exe’ (Win32): Loaded ‘C:\Windows\System32\ksuser.dll’.
‘OpenCVtest.exe’ (Win32): Loaded ‘C:\Windows\System32\kernel.appcore.dll’.
‘OpenCVtest.exe’ (Win32): Loaded ‘C:\Windows\System32\cryptbase.dll’.
‘OpenCVtest.exe’ (Win32): Loaded ‘C:\Windows\System32\imm32.dll’.
‘OpenCVtest.exe’ (Win32): Loaded ‘C:\Windows\System32\bcryptprimitives.dll’.
‘OpenCVtest.exe’ (Win32): Loaded ‘C:\Windows\System32\RTWorkQ.dll’.
‘OpenCVtest.exe’ (Win32): Loaded ‘C:\Windows\System32\umpdc.dll’.
The thread 0x45c8 has exited with code 0 (0x0).
The thread 0x476c has exited with code 0 (0x0).
The thread 0x4f8 has exited with code 0 (0x0).
The program ‘[18384] OpenCVtest.exe’ has exited with code 0 (0x0).